

There’s something oddly comforting about a peanut butter cookie — that warm, nutty aroma, the soft crumble between your teeth, and the sweet-salty flavor that somehow always hits just right. And if you’ve ever craved that comfort but didn’t want to fuss with complicated steps or dough chilling, this peanut butter cookies recipe is your new best friend.
Let’s be honest: baking should feel like a win, not a chore. That’s why this version skips the chilling, the special equipment, and the overlong ingredient list. Just pure peanut butter bliss in about 15 minutes flat.
What makes these cookies a keeper? The texture. We’re talking melt-in-your-mouth softness with just the slightest edge crisp — thanks to creamy peanut butter, a touch of brown sugar, and a fast, foolproof bake. No fancy flours or chilling tricks. Just the kind of classic cookie your childhood dreams were made of — only easier.
Whether you’re baking a quick batch for the kids, planning a casual dessert for friends, or just need that 3 p.m. sweet fix, this recipe delivers. Consistently. Effortlessly. And addictively.
Table of Contents
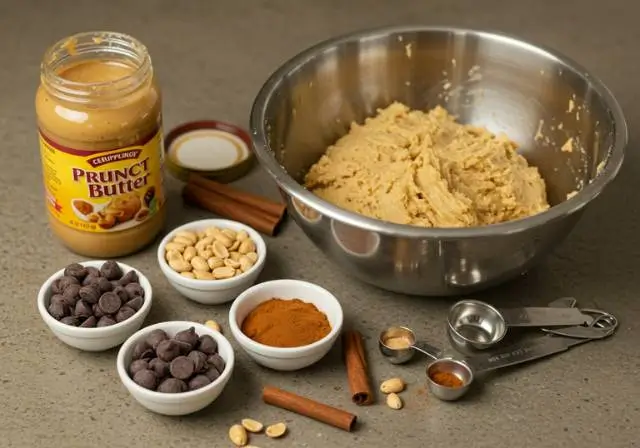
Ingredients You’ll Need
You probably already have most of what you need sitting in your pantry. This peanut butter cookies recipe keeps it simple — no fancy flour blends, no obscure extras. Just solid, classic ingredients that work every time.
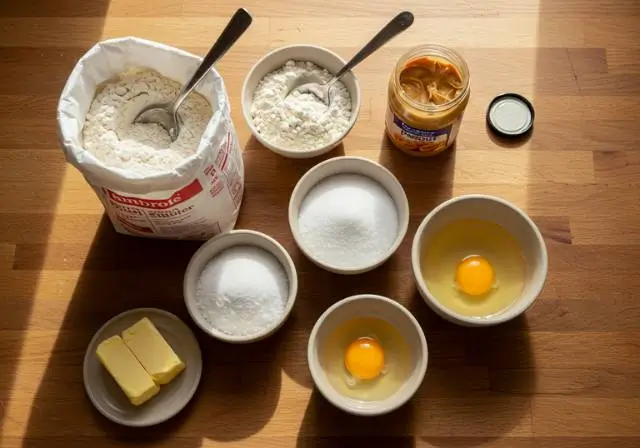
Dry Ingredients
- 1 ½ cups all-purpose flour (180g) – Scoop-and-level for best results or use a kitchen scale if you have one.
- ¾ tsp baking powder (3g) – This gives just enough lift to avoid a dense cookie.
Wet Ingredients
- ½ cup unsalted butter, room temperature (113g) – Salted works too; just cut back any added salt.
- Use 1 cup (250g) of peanut butter — smooth for a classic texture, or crunchy if you prefer a bit of bite. Avoid super oily natural types unless stirred very well.
- ½ cup light brown sugar, packed (100g) – Adds moisture and a rich, almost caramel note.
- ½ cup granulated sugar (100g) – For that signature crispy edge and balanced sweetness.
- Add one large egg at room temperature, which helps hold the dough together.
- 1 tsp vanilla extract (5mL) – Optional, but it rounds out the flavor beautifully.
Optional:
- ¼ to ½ tsp sea salt – Add this only if your peanut butter cookies is low-sodium or unsalted. It deepens the peanut flavor.
Can I use natural peanut butter in cookies?
Yes — but be cautious. Natural peanut butter cookies tends to separate (hello, oil puddle). Stir it thoroughly before measuring, and note the dough may be softer. You might need to add a spoonful more flour to balance things out.
How to Make Peanut Butter Cookies (Step-by-Step)
These cookies come together fast — and the process is just as satisfying as the first bite. If you’ve got 15 minutes and a few pantry staples, you’re halfway there.
Step 1: Get Your Oven Ready
Start by preheating your oven to 350°F (175°C). Prepare your baking tray by lining it with either parchment paper or a silicone baking mat. This keeps the bottoms from browning too quickly and makes cleanup a breeze.
Step 2: Combine Your Dry Ingredients
In a large bowl, mix the all-purpose flour with baking powder. A quick whisk will ensure everything’s evenly distributed. Set aside for now.
Step 3: Cream the Butters and Sugars
In a larger bowl, beat the room-temperature butter, brown sugar, and white sugar until the mixture turns fluffy and pale. This step helps create that soft, melt-in-the-mouth texture. Use a hand mixer or stand mixer if you have one — it’ll save your arms.
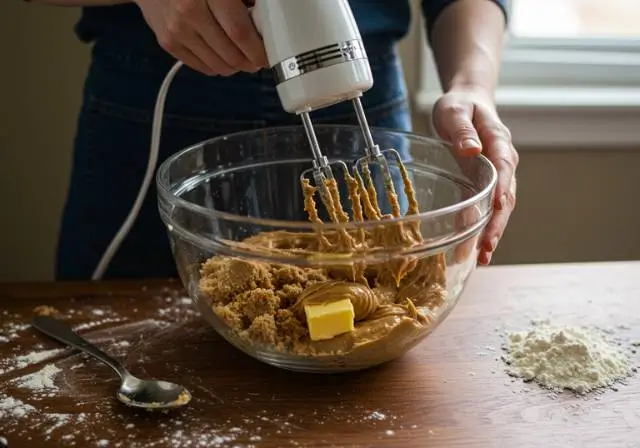
Step 4: Stir in the Peanut Butter
Stir in the peanut butter until the mixture forms a thick, unified dough — that thickness is perfect. The dough will be thick — that’s a good sign.
Step 5: Add the Egg and Vanilla
Crack in the egg and add a dash of vanilla extract to bring it all together. Mix again until the dough is fully combined. Be sure to scrape down the sides and bottom of the bowl so everything gets fully incorporated.
Step 6: Bring It All Together
Now, add the dry mixture to your wet ingredients. Go slow here. Blend the dough on low speed or mix by hand just until all the flour is fully incorporated. Avoid overmixing, as it can lead to tough cookies — and nobody wants that.
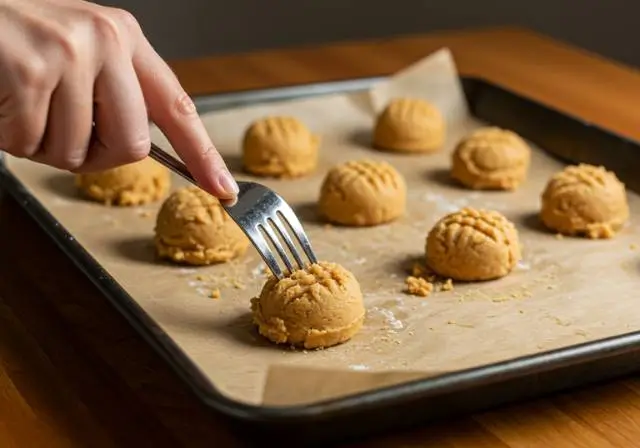
Step 7: Shape the Dough
Scoop out rounded tablespoons of dough and shape them into smooth balls with your hands. You’re aiming for about 1 inch in diameter. Arrange them on your prepared tray with space in between — they won’t spread much, but a little room helps.
Step 8: Press with a Fork
Use a fork to gently press down on each ball, then turn the fork and press again to create a classic criss-cross pattern on top. If your fork starts to stick while pressing the cookies, lightly dust it with flour to prevent sticking.
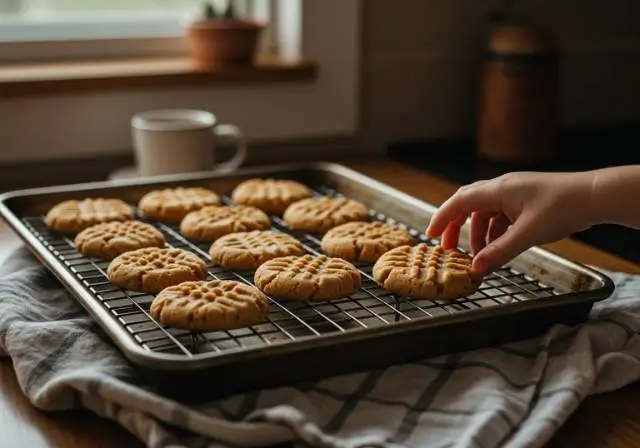
Step 9: Bake
Slide the tray into the oven and bake the cookies for around 8 to 10 minutes, just until the edges are set. Keep an eye on them — they should look slightly underbaked in the center with just a hint of color around the edges.

Step 10: Cool Before Handling
Allow the cookies to rest on the baking tray for at least 10 minutes before transferring them They’ll firm up as they cool, and trying to transfer them too early can lead to breakage.
Is it okay if they look soft when I take them out?
Absolutely. In fact, that’s the secret to their perfect texture. Pull them out before they’re fully baked, and the residual heat will finish the job — giving you a cookie that’s soft inside but not raw.
Pro Tips for Perfect Peanut Butter Cookies
Even with a simple recipe, a few smart moves can take your cookies from “pretty good” to “how did you make these?” Here’s what bakers learn the hard way — so you don’t have to.
Don’t Overbake — Trust the Soft Look
This one’s huge. Peanut butter cookies don’t need to look golden all over to be ready. If the edges are just turning color and the centers still look a bit doughy, pull them out. Let the cookies cool on the baking sheet; they’ll naturally firm up without drying out. Overbaking leads to dry, crumbly cookies, and no one’s asking for those.
Fork Sticking? Use This Trick
If your fork sticks when pressing down the criss-cross pattern, just dip it in a bit of flour or sugar between cookies. You’ll get clean lines without dragging the dough.
Want a Cleaner Criss-Cross? Try Skewers
If you’re going for Instagram-worthy perfection, swap the fork for four thin wooden skewers. Line them up and press — it takes a little extra time, but the uniform look is beautiful.
Use Creamy Peanut Butter for a Softer Crumb
Natural peanut butters (you know, the kind that separate in the jar) can work — but they need to be stirred really well and tend to produce a slightly looser dough. For best results, use a creamy, stabilized peanut butter like Jif or Skippy. Chunky works too, but your cookies will spread a bit less.
Let the Dough Rest (If You Can Wait)
Although chilling isn’t required, giving your dough even 15 minutes to rest at room temp helps hydrate the flour and gives the cookies a more consistent bake. Not essential, but helpful.
How do I keep peanut butter cookies soft after baking?
The trick is in the storage. Once fully cooled, store your cookies in an airtight container with a slice of white bread — it keeps them tender for days. It’s the bread that goes stale — these cookies stay soft. Pretty amazing, right? Almost.
Substitutions & Variations
Every kitchen is different — and so are the people baking in them. Whether you’re missing an ingredient, baking for someone with dietary needs, or just in the mood to switch things up, here’s how to adapt this peanut butter cookies recipe to fit your moment.
Ingredient Swaps
- No brown sugar? Use all white sugar. The flavor will be slightly less rich, but still delicious. A tiny splash of molasses can mimic the brown sugar effect if you have it.
- No butter? Substitute with margarine or even coconut oil (solid, not melted). The flavor will shift a bit, but the texture holds up surprisingly well.
- Need it egg-free? Try a flax egg: mix 1 tbsp ground flaxseed with 3 tbsp water, let sit for 5–10 minutes, then use as you would a regular egg.
- Gluten-free? Just swap in a 1:1 gluten-free baking flour blend for the all-purpose flour. Avoid straight almond or coconut flour unless you know how to rebalance moisture and structure — these cookies are delicate already.
Flavor Twists
- Toss in some chocolate chips for that unbeatable peanut butter-chocolate combo. Fold in ½ to ¾ cup of semi-sweet or dark chocolate chips before baking.
- Cinnamon peanut butter cookies – Add ½ tsp cinnamon to the dry mix for a cozy, spiced touch.
- Salted peanut topping – Press a few roasted salted peanuts into the top before baking for crunch and visual flair.
- Making them vegan? Swap in dairy-free butter and a flaxseed egg instead. Just make sure your sugar is vegan-friendly too.
Can I make the dough ahead of time?
Definitely. Wrap the dough tightly in plastic or store in an airtight container, and refrigerate for up to 3 days. You can also freeze pre-rolled dough balls for longer storage — just bake straight from frozen and add a minute or two to the bake time.
FAQs
Why do peanut butter cookies have criss-cross fork marks?
It’s not just for looks — though let’s admit, it does give them that old-school charm. Peanut butter cookie dough is thicker and denser than most, which means it won’t spread much in the oven. Flattening each ball with a fork helps them bake evenly and prevents a doughy center.
Can I chill the dough before baking?
You don’t need to — that’s one of the beauties of this recipe. But if you’re prepping ahead or want an even thicker cookie, chilling won’t hurt. Just know it might reduce spreading, so give your cookies a little extra flattening with the fork.
How long do peanut butter cookies stay soft?
Stored properly, they stay soft for about 5–7 days. Airtight container is key. Add that slice of white bread (yep, seriously) to help lock in moisture — the cookies absorb it and stay chewy while the bread goes stale.
What’s the best peanut butter to use?
Stick with creamy, shelf-stable peanut butter cookies like Jif or Skippy for the best texture and consistency. They give a consistent texture and flavor. Natural peanut butters can be tricky — they tend to separate and create a greasy or overly soft dough unless stirred very well.
Can I freeze peanut butter cookies?
Absolutely. You can freeze the dough (either as a block or pre-rolled balls) or the baked cookies themselves. Baked cookies freeze well for up to 2 months — just thaw at room temp or warm them briefly in the oven for that “just-baked” feel.
Conclusion
If you’ve made it this far, chances are you’re already halfway to preheating your oven. These peanut butter cookies aren’t just easy — they’re the kind of easy that earns repeat requests, fridge raids, and maybe a few “Did you really make these yourself?” comments.
They’re fast, familiar, and satisfying in a way store-bought never quite matches. And whether you follow the recipe to the letter or put your own spin on it, the outcome is something better than perfect: homemade.
So, go ahead — bake a batch. Then come back and let us know how yours turned out. We’d love to hear if you added chocolate chips, used crunchy peanut butter, or (bold move) doubled the recipe on your first try.
Until then, happy baking — and happy snacking.